


What is Logo?
A logo is a graphic mark, stamp, symbol, or stylized name, used to recognize a company, brand, product, or organization as well. It is the form of an abstract and figurative design it also presents as a stylized form of the company’s name.
Benefits and Essentials of Logo Designing
Your logo design helps you to differentiate yourself from your competitors. It is the face of the company. Everyone comes across thousands of logos every day, but they only remember those that are important to them.
Here we have few essential requirements to make a perfect logo.
- Logomark
- Typography
- Color
- Content
Logo Mark
The logo mark could be a symbol, image, or icon. It helps to look prominent and memorable for the audience.
Typography
Typography is a text logo in the design. This could be your business name, but you can also choose a slogan or tagline.
Color
Color is an important element of logo design. It may contain lots of colors to deliver the message that what the company is doing. Each color has its own theory. By pairing different colors with each other, you can create endless color palettes to use in the logo.
Content
Your logo design needs good content because it would be helpful for the audience to understand what you are delivering. It would be useful for your logo mark or in typography.
Tools to make an Adequate Logo
Well, there are lots of tools exists, through which we can make a good logo for brand, company, product or organization. It’s all on a graphic designer from which he/she get ease to do work. There is a huge amount of websites, providing logo designing they are quick but they mostly make logo through automating work, and here we have 2 official tool that designers choose to work on it.
Requirements before making logo
Make sure you have Key Words for Logo
At beginning of making a logo, you should keep remembering that you have keywords to perform your art in the project. The keywords could be a name, tagline, or slogan of a company through which the company is willing to represent themselves.
Once you have all information about that company then you can turn them into a logo that works. You can start by making a list of all relevant keywords of the project. Write down every word that you found through further searches and select 2 to 3 accurate words for Logo.
Find Images through Keywords
When you have found all the keywords for the logo then search it on Google to find the elements about those words. It will help you to make a perfect relevant designed shape that will be beneficial for the presentation of the company’s facts and figures.
After finding all the related images you can get more ideas to make the perfect shape of the logo.
Make a Sketch of founded Image on paper
When you have selected the images for ideas then try to put a sketch of it on paper. You should sketch as many ideas and concepts as possible. Keep the company’s information in mind and don’t be afraid to go a little off the rails and try to make something different which looks reasonable.
Making A Logo Using Adobe Illustrator
Well, it’s not a big deal to make a logo in illustrator as it is a professional tool for graphic designing so you can make a logo here easily by using several tools. There are a few essential points to be noticed.
When you have done all the searches and ideas which you want to put in the logo, you can open the Adobe Illustrator. By following those steps you can easily make a good logo for a company, organization, or product. Read carefully and follow the steps accurately.
Step 1: How to create Workspace in illustrator for Logo?
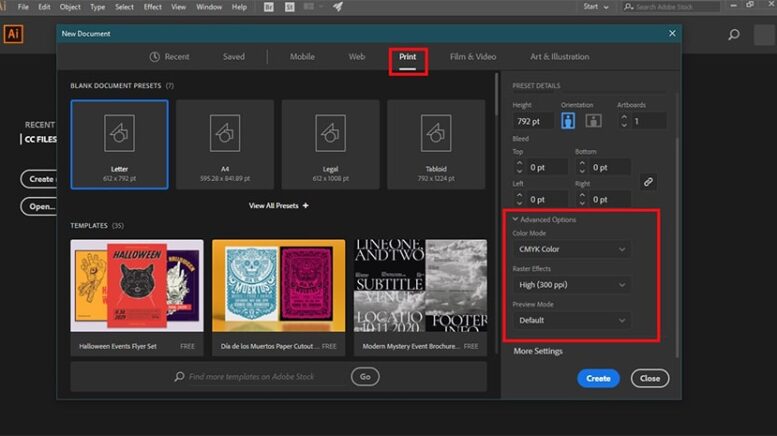
When you have opened Ai. In the upper left corner, there is a button “Create new” Click on it. A new window will open that contains having different options for creating new documents. If you want to create a logo that has a high resolution for print, you can create a document from the print section.
Click on the print section which is located in the top bar in the middle. Then Ai will give you a few samples of artboards you can choose according to your requirements. After deciding the artboard size make sure your selected orientation is set as vertical.
Then make sure the color mode is set to CMYK colors and the raster effects is set to High (300 ppi).
Then click on the create button located on the right downside of the window. This will open a new document and we can start designing there.
Step 2: Importance of Layers
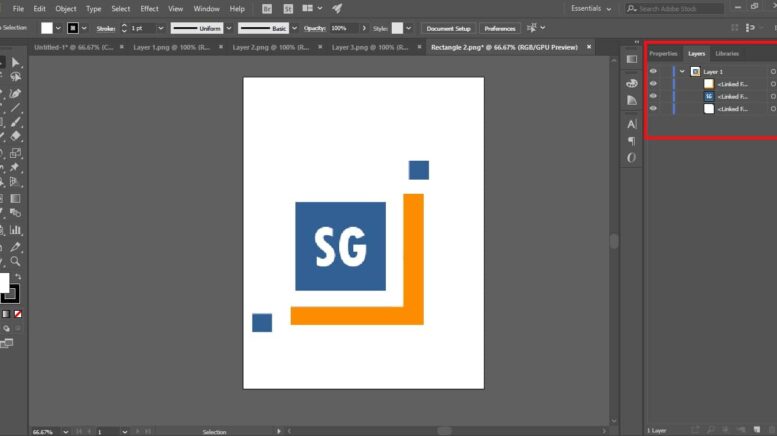
You can use the Layers panel to organize the objects in a document. By default, every new document contains one layer. Each object you create is listed under that layer.
However, you have to create new layer to place different elements of your logo through which you can rearrange items which best suits to your need. To add a new layer you can select “add new layer” from the bottom of the Layers panel to create a new layer.
Step 3: Draw a similar Shape of paper sketch on Artboard
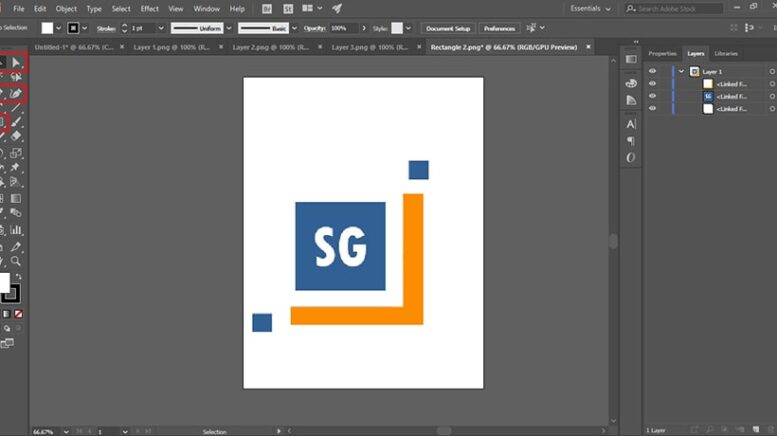
Now you can draw your paper sketch on the artboard to make your logo mark. To make a mark on the artboard you can use the tools from the toolbar.
There you can use a shape tool or pen tool at first to make a good structure and after that, you can add further finishing through different tools when you have created your shape and it is not centered enough in your artboard, then you can do it with selection tool by hitting “v” on your keyboard or select the selection tool from the main toolbar.
With the selection tool, you can easily click and drag your shape to the center of the page.
Putting color in shapes:
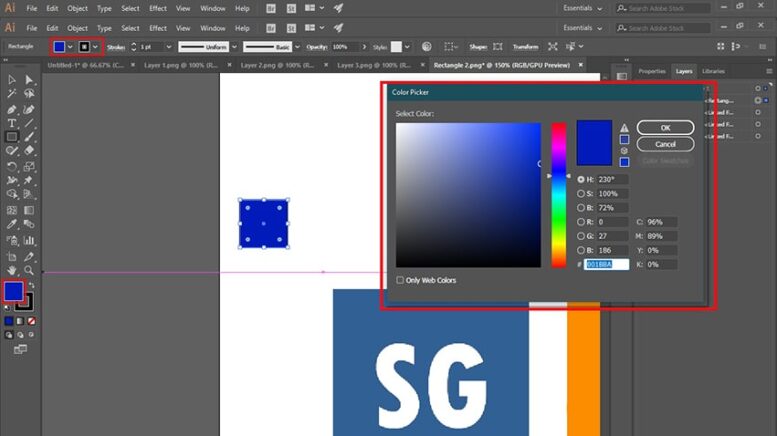
When you have done your drawing, you can fill the colors in it. You can choose the colors from adobe color to make your logo visually perfect. But avoid to use irrelevant colors, it might make the logo sloppy.
Here a theory behind every color so before choosing colors make sure you have choose the perfect or relevant color.
Step 4: Add Text to the Logo

While designing a logo you have to decide which font suits your logo. You can use letters, numbers, or symbols as a tagline or keyword in your logo. There’s no right place to put the text, if you want it to look little like a badge add text below the logo with a relevant font that matches and suits your shape.
You can choose the “Type Tool” and click anywhere on the artboard; a blinking cursor will appear, now you can type whatever you want.
When you have done with typing the words then choose the “Selection Tool” from the top of the Tool Bar or by pressing v to switch it from the Type Tool to Selection Tool. You can easily move and adjust your text with your logo mark.
Step 5: Make duplicate copies of designed logo
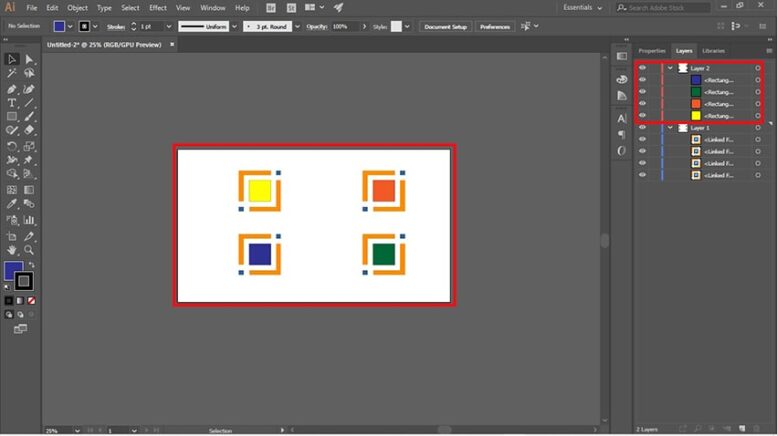
You can duplicate the logo by pressing Alt key from keyboard and drag it. When you make duplicate copies of your design then you can add the changes to other copies through which you can compare your designs with other all copies. The benefit of making duplicate copies is that by comparing them we can recognize which one is looking good as our object and we can finalize it.
Step 6: How to save Logo in illustrator?
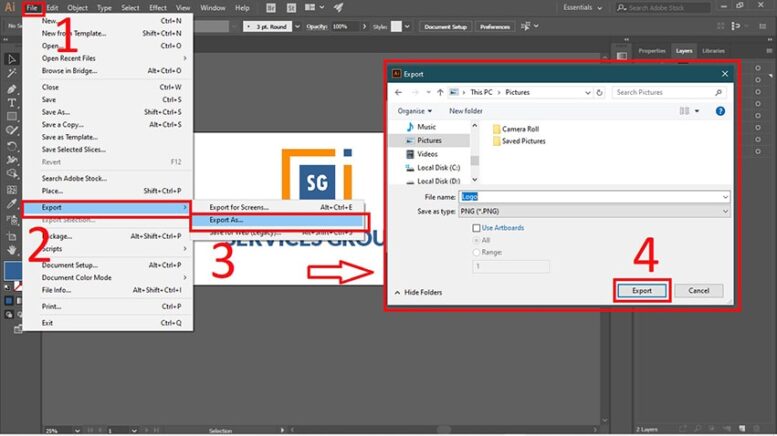
When you’ve created your logo you can save it by clicking File from the menu bar then click on Export as the dialogue box will appear where you can select save as type to PNG. Name your file as desired and click Export.
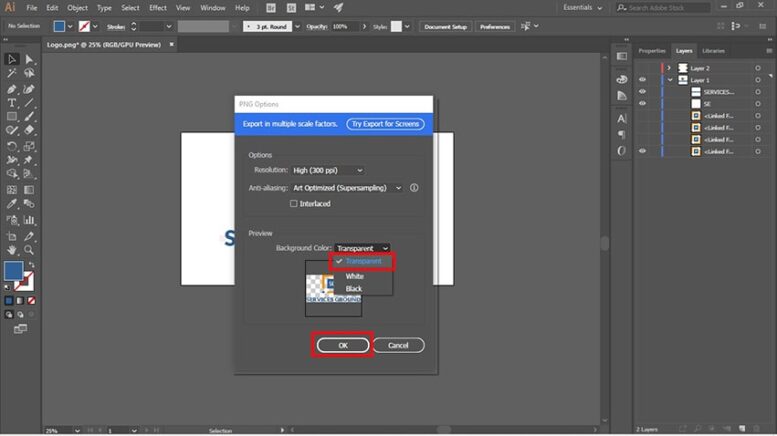
The “PNG Options” window will appear. Make sure that you have selected a transparent background color and click OK.
The benefit of exporting files is it automatically crops out the empty space in the board to only include the logo, which makes the resulting PNG files only with essential parts of the design.
Making A Logo Using Adobe Photoshop
Well, here is almost similar work as we have read in the illustrator portion before opening Photoshop for work, read those points carefully.
Step 1: How to Create a file
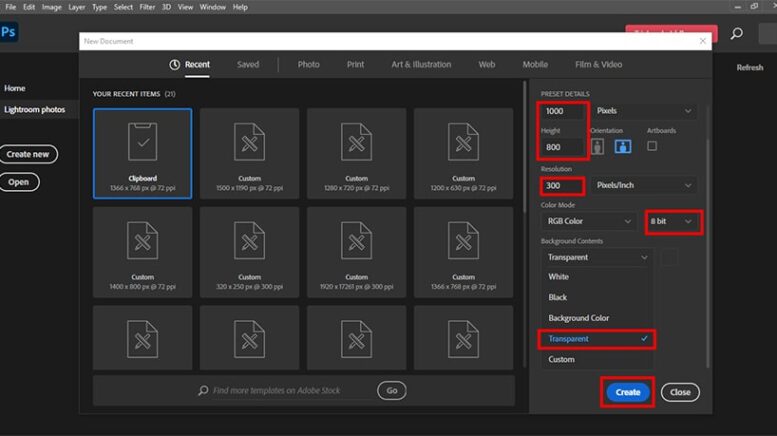
In Photoshop at first, you have to create a new file. You can choose File -> New from the menu bar or can create it by pressing Ctrl+N, and then the dialog box will appear on screen with a bunch of different settings. Now you have to select the size of your canvas for the logo and this could be a rectangle or square it’s about the dimensions with a width or height. You can start with 1000 pixels of width by 800 pixels height, don’t worry about the canvas size at this point because it could be adjusted when needed. Set your background to transparent, resolution to 300, and the color mode to RBG Color with 8 Bit and click on Create below.
Step 2: Work on different Layers
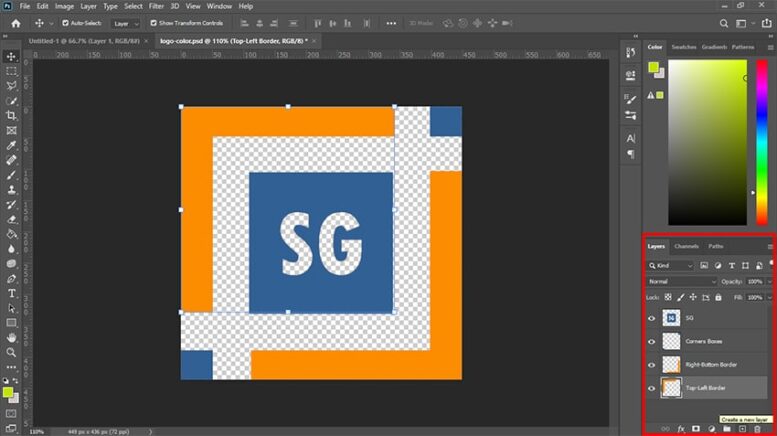
Always remember that each new element of your logo is on its own layer, which will make it easier to fix things if you did any mistake later on.
To add a new layer you can select “add new layer” from the bottom of the Layers panel and you can press Shift+Ctrl+N to create a new layer.
Step 3: Add Background in Logo
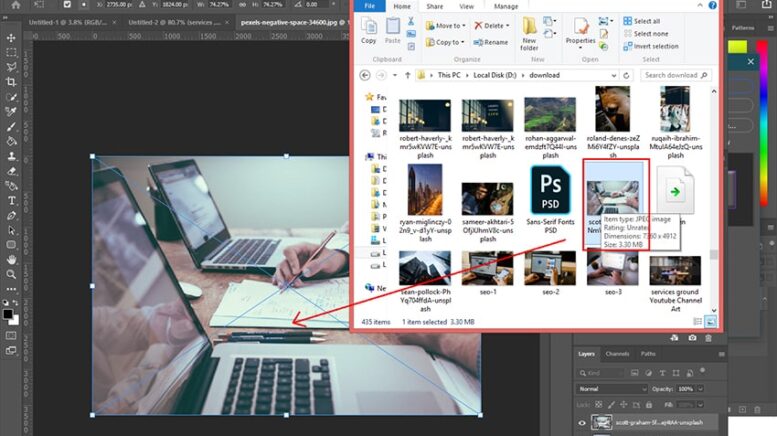
If you want to use a texture or background in your logo you can add it by dragging and dropping the image from the folder to canvas, which will automatically create a new layer. By placing the background image on a separate layer will make it easy to drop behind all other elements in your logo.
Step 4: Artwork in Logo
Mostly, people find it very difficult to do artwork that doesn’t look completely terrible or simplistic. That’s why most people use the text-only logo. You just don’t worry about to do artwork on your logo, probably you will find it interesting.
Step 5: Add Text in Logo
While designing a logo you have to decide which font suits your logo. You can use letters, numbers, or symbols in your logo. If you’re using different fonts to make a hybrid font for your logo then you have to use a separate layer for each font through which you can adjust it individually.

You can choose the “Type Tool” and click anywhere on the canvas; a blinking cursor will appear, now you can type whatever you want. When you have done with typing the words then choose the “Selection Tool” from the top of the Tool Bar or by pressing Ctrl + V to switch it from the Type Tool to Selection Tool.
The Selection Tool is used to move the typed text on the canvas. If you want to edit text you can choose the Type Tool again and simply.
- Add Colors in Text:
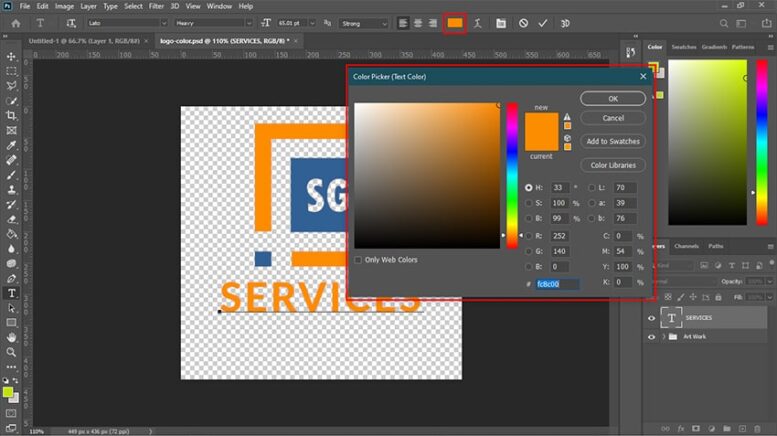
If you want to change the color of the text then highlight the text by using Type Tool and click on the Font Color box in the toolbar above the canvas.
A dialog box will appear where you can easily change the color of the font through Pantone swatches in Color Libraries or by clicking on a color field.
Choose colors carefully because there is a theory behind every color.
- Add Shadow behind the Text:
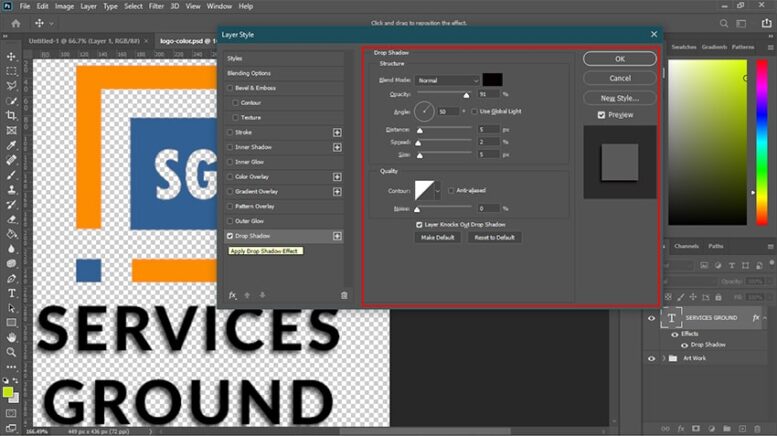
If you want to add a shadow to the text then right-click on the Type layer and choose “Blending Options” from the dialog box. Click on Drop Shadow and you can adjust it easily from the appeared box and make sure you have checked the Preview box below, from where you can see how you’re adjusting.
Add Outer Glow to the Text:
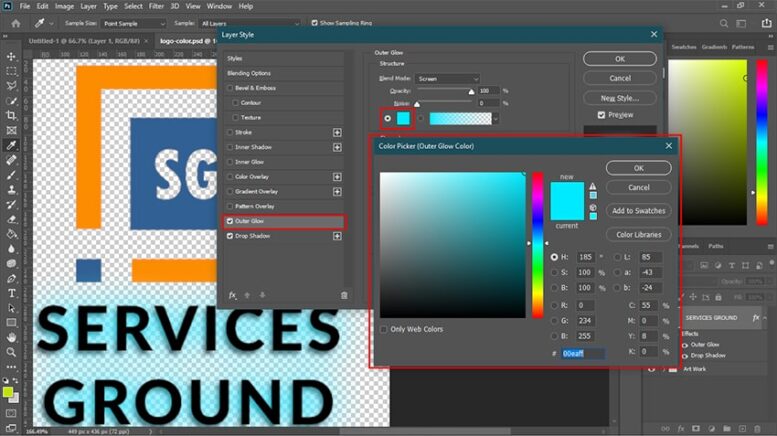
You can also add the glow with different colors in your text. The goodness of glow is, by adding an Outer Glow you add some visual interest to your text, although it doesn’t work with all fonts fewer looks bit sloppy, although you can try this.
- Make the Text 3D:
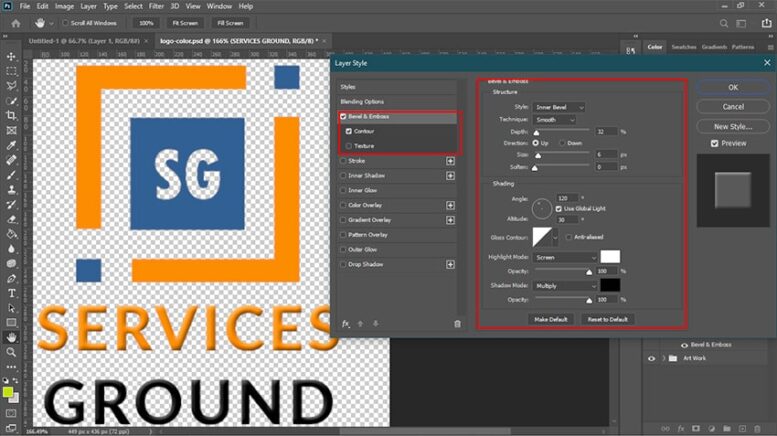
If you want the three-dimensional quality to your text, you can choose Bevel and Emboss from the dialogue box, which will add highlights to the edges of the font to make it look 3D. Make sure that you have added Contour if you want this three-dimensional effect to really stand out.
- Add Stroke to the Text:
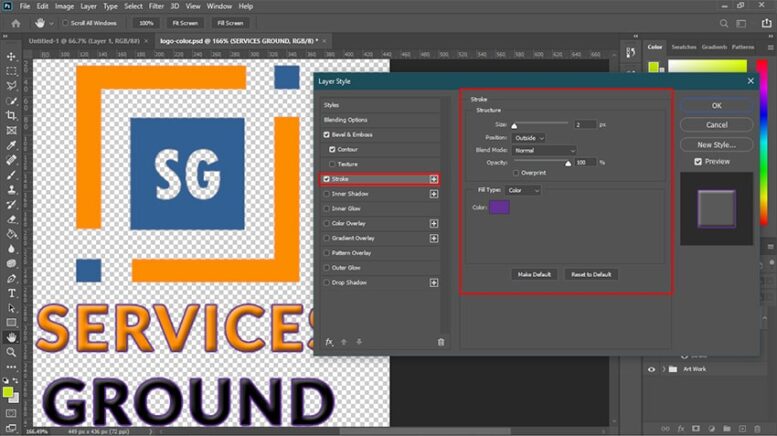
You can add an outline by choosing Stroke from the list of Blending Options and each letter in your text will be individually outlined.
When you have done with your logo, you can save it by selecting “save as” from the menu bar or by pressing Ctrl+S.
The dialogue box will appear, below there you can choose a file type as PNG for logo and click save.
If you liked this article make sure that you subscribe to our newsletter for more articles like these. Also, you can follow us on our social media accounts on Facebook, YouTube, Twitter, and Instagram.